Thursday, January 4, 2018

Torta Salata with Eggplant and Tomatoes


Last Saturday, we had guests for lunch because Andrea needed to meet with a couple from our stake. This family would be driving an hour to come to Piacenza, so it was the least we could do to offer them lunch. I however have been exhausted lately (thanks, pregnancy) and couldn't even face the thought of making a proper Italian meal, which is made up of no less than three courses. I asked Fausta if she had a lasagna or baked pasta in her freezer (because her freezer is where all the goodies are!) so at least I wouldn't have to worry about the main dish. As always though, Nonna went above and beyond: Saturday morning she brought over a fresh baked pasta, an apricot cheesecake, and this torta salata which ended up being the star of the meal. Literally everyone had seconds and couldn't stop raving about it. Then they started raving about what a great cook I was and I had to come clean and tell them that I'm actually just a pro at mooching off my mother in law ;) So, I decided to learn to make that torta salata in order to actually take credit for it the next time it's on the table. 

The torta salata is the quintessential Italian appetizer. Literally, torta salata means savory cake; essentially it is the Italian version of a quiche, but much less intimidating!

Torta Salata with Eggplant and Cherry Tomatoes
Torta salata con melanzane e pomodorini 


Ingredients:

1 large puff pastry 
2 cups cherry tomatoes
2 small eggplants
1 medium leek
1/2 a cup sun dried tomatoes
3 teaspoons capers
Mozzarella 
3/4 cup ricotta
1/4 cup grated parmesan
1 cube vegetable bouillon
The white of one egg
Sugar 
Salt 
Pepper 
Oregano 

Instructions:

1. Cut two cups of cherry tomatoes in half and lay face up on a parchment paper covered baking sheet. Sprinkle with salt, pepper, sugar*, and then drizzle with oil. Place in the oven at 350 degrees for about 10 minutes, just until they have begun to soften. 

*In Italian recipes a small amount of sugar is often added to the tomatoes to counteract the acidity and render the tomato or sauce a bit sweeter. 


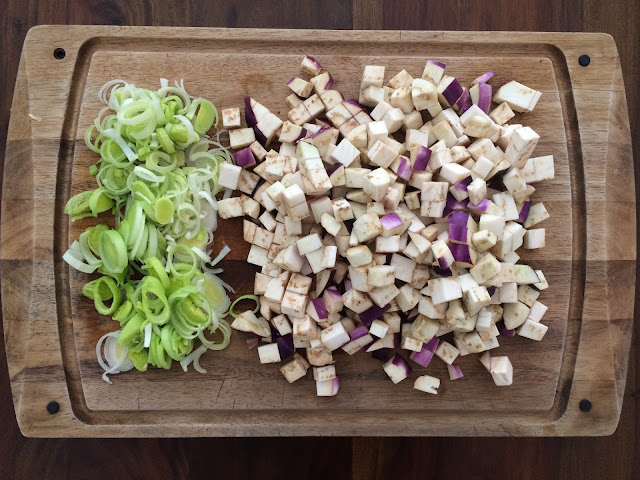
2. Cup up the eggplant into half inch cubes. 

3. With a knife, remove the dark green leafy end of the leek and discard it (or utilize it for a recipe that calls for vegetable stock). Slice the white and light green part of the leek into thin rings. In a generous amount of oil, sauté the leak over medium heat. 


4. Once the leak has softened, add the eggplant and keep on the heat until cooked. If the oil has disappeared and the eggplant starts to brown before it's cooked, add water and half a cube of vegetable bouillon to the pan. Don't add more oil because the eggplant should not be oily. Add salt and pepper to taste. 


5. Once cooked, transfer the leek and eggplant to a mixing bowl and let cool. While it's cooling, cut the mozzarella into thin slices - just enough to cover the top of the torta salata.  

6. Unroll the puff pastry and lay it in a baking tray. Prick the crust with a fork, which will allow the steam to escape. 

7. Once cool, mix the eggplant and leek with the ricotta and parmesan cheese. Then evently spread the mixture over the puff pastry, making sure to leave one inch of space from the edge. Fold over the edge of the puff pastry to create a crust and brush the crust with an egg white.  


8. Sprinkle the capers and sun-dried tomatoes over the filling, then place the sliced mozzarella disks on top. Lastly, place the cherry tomatoes over the mozzarella and sprinkle with oregano. 


9. Place in the oven at 350 degrees for 30 minutes. It's done when the bottom side of the dough is golden. Serve warm. 


Monday, March 20, 2017

Spinach Polpette

One of my big New Year’s resolutions is to cure my kids of picky eating. Since January, each week I’ve been creating intense meal plans which include at least ten fruits and ten vegetables cooked in unique ways (baked, sautéed, steamed, raw, etc.). Two months in, I’m grasping glimpses of my hard work paying off: Scotty has eaten everything I have served him for the past three weeks (except celery…can’t say I blame him) and Matteo has finally started tasting/nibbling on the vegetables on his plate. My favorite books on the topic of turning kids into healthy eaters are Getting to Yum and It’s Not About the Broccoli. Check them both out from the library and I promise they will change the way you think about food and serve meals to your children. 

 Dina Rose, the author of It’s Not About the Broccoli, cites an interesting study which found that sweet and umami flavors are excellent vehicles for getting kids (and adults!) to like new tastes. For example, Rose suggests serving kids Greek yogurt with mini chocolate chips as a way for children to familiarize themselves with the taste of plain Greek yogurt. After a few months the kids can replace the chocolate chips with sprinkles and then when fully weaned should be able to eat and enjoy plain Greek yogurt by itself. My kids still only eat plain Greek yogurt with the chocolate chips, but I have used this idea to introduce them to new vegetables. Months ago I started serving Scotty and Matteo a squash, zucchini, and tomato stir-fry, and in the beginning I let them put as much grated parmesan cheese on it as they liked. I slowly took away the option of parmesan cheese and now Scotty eats the stir-fry plain. The cheese served as a crutch to introduce him to the new flavors and textures, but now is no longer needed. (And in case you think my kids are perfect, know that Matteo still only eats the stir-fry with the grated parmesan on top and this morning he cried big crocodile tears about being served a kale omelet!) 

Similarly, for the past year, nonna has been serving my boys spinach polpette. These polpette are just as full of cheese as they are spinach, and although the massive amount of cheese probably negates some of the health factors, it has been an excellent vehicle for getting my kids to like the taste of spinach. Last week for dinner we ate chicken, sweet potato fries, and sautéed spinach with a little grated parmesan on top. After finishing the sweet potato and chicken Scotty turned to me, suspiciously pointed to the wet green blob and asked what it was. I responded, “Spinach. Just like you eat in your omelets and like the spinach polpette that nonna makes.” His response was “Oh” and then he turned to his brother and said, “Matteo, I love spinach.” I practically fainted. 

So here’s nonna’s polpette di spinaci recipe that my kids gobble up and that I think is the absolute best way to introduce kids to spinach. Hopefully your kids these as much as mine do. 

Spinach Polpette
Polpette di spinaci 


Ingredients:

1 extra large bag or 16 cups of tender spinach leaves (500 grams)
3/4 cup of ricotta cheese
2.5 cups of parmesan cheese
Any hard cheese such as scamorza or mozzarella
Yolk of one egg
Bread crumbs (optional)
1 clove of garlic
Pepper
Salt

Instructions: 

1. In a large frying pan, heat up one tablespoon of olive oil over medium heat. Add the clove of garlic and sauté until partially transparent and the aroma has hit its peak. 
2. Next take the garlic from the pan and replace with the spinach. Cover with a lid and let cook over medium heat. Make sure to stir every minute or so. Add desired amount of salt and pepper about halfway through the cooking process. 


3. When fully cooked (about 5 minutes), transfer the spinach to a colander and let the excess liquid run off. Leave to cool down. 

4. In the meantime, cut pieces of hard cheese in 1/4 by 1/4 inch cubes and grate the parmesan cheese. 

5. Return to the spinach and firmly squeeze the leaves of as much excess liquid as possible. 

6. On a cutting board, mince the spinach extremely finely.


7. Transfer the spinach to a large bowl and mix in the ricotta very well. 

8. Add the parmesan and the yolk of one egg. 

9. The softness of the mixture will vary depending on how much liquid remains in the spinach. If the spinch and cheese mixture is still too soft to form small balls, add bread crumbs until you've reached your desired consistency. 

10. Grab a piece of spinach/cheese mixture and roll into a ball. With your finger, make an indent in the middle and place a cube of hard cheese there. (I love scamorza, but you can also use a hard mozzarella.)


11. Wrap the spinach mixture around the cheese and place seam down on a baking sheet covered with parchment paper. 

Note: You can also cook these spinach polpette without the cheesy center, which is how my kids usually eat them. When I make them plain, I try to shape smaller balls; the smaller they are the more fun my kids have eating them. 

12. Once your baking sheet is full, spinkle the spinach polpette with bread crumbs and drizzle olive oil on top. 


13. Place in a 375-degree oven for 30 minutes, making sure to turn the polpette halfway through the cooking time. You'll know that they are ready to be flipped when the bottoms have developed a thin crust. 

14. These polpette make the perfect snack. Today I'm tossing six in a Ziploc and we're taking them to the park with us as our afternoon merenda.  

 {An excellent snack option that my kids also enjoy eating.}


Monday, February 27, 2017

Genoese Trofie with Pesto, Potatoes and Green Beans

When it comes to eating well in Italy, Liguria shines. The Italian Riviera is the birthplace of focaccia, pesto, and ravioli. Two summers ago Andrea, the boys and I visited Genoa where we ate focaccia 3-5 times a day and brought home bottles of Genoese pesto. One of those warm summer nights we dinned al fresco at a restaurant in the heart of Genoa where I ordered the city's traditional trofie alla genovese, which tasted like a dream. Like most Italian dishes, it's secret is in using few but fresh ingredients and letting the combination of flavors tickle the taste buds. 


Genoese Trofie with Pesto, Potatoes and Green Beans
Trofie alla genovese


{Nonna's handwritten recipe.}

Ingredients:

Below I have written out the classic proportions, however this recipe is hard to mess up and you can really just add the quantity of potatoes and green beans you'd like. 

17 ounces of trofie liguri (500 grams)  
2 large potatoes
2 cups fresh green beans cut into pieces 1-1.5 inches long (200 grams)
Pesto

Obviously homemade pesto tastes best, but for convenience any fresh pesto will work. My absolute favorite brand for pesto (and pizza!) is Buitoni. Click here and at the bottom of the page enter in your zip code and the website will generate a list of the closest stores the sell Buitoni pesto. 

{I'm saving the Genoese pesto recipe for another day, but these basil leaves are too pretty not to post!}

Instructions:

Below I've described one of the classic ways of cooking this Genoese dish. Italians like to cook the vegetables and the pasta in the same water so the pasta will have more flavor. (For example, nonna's broccoli pasta isn't nearly as good if the broccoli and pasta are boiled in separate cooking water.) However, being an amateur cook myself, I sometimes have difficulty getting the potatoes, green beans, and pasta all perfectly al dente when they are cooking in the same pot. If you need to, you can boil each ingredient separately and then mix them together with pesto...just don't let nonna find out!

1. Bring a lot of salted water to boil in a large pot. 

2. While waiting for the water the boil, peel and dice the potatoes and cut the green beans into pieces 1-1.5 inches long. 


3. Once the water has come to a rolling boil, drop in the potato chunks and cook for ten minutes, then add the green beans. 

4. Cook the green beans and potatoes together for another five to seven minutes and then add the trofie pasta and cook for five minutes, or until al dente. 

5. When the vegetables are tender and the pasta is cooked, lift everything from the pot using a skimming ladle or a slotted spoon (this will keep the potatoes from breaking apart under the weight of the pasta and water). 

6. Toss the pasta and vegetables together with pesto and add a bit of cooking water to create a creamier sauce. Serve immediately with grated parmesan cheese on top. 


Thursday, February 9, 2017

Chicken Roulade with Red Currants and a Raspberry Sauce

Chicken roulades are hands down my favorite way to eat chicken. Really, who wouldn't want to eat chicken rolled around a soft bread and red currant center for every meal?! The best part about this dish is that it looks refined, but requires few ingredients and is easy to make. This chicken roulade will take any dinner from average to star status. 

Chicken Roulade with Red Currants and a Raspberry Sauce
Involtini di pollo con ribes e una salsa al lampone


Ingredients: 
4 boneless, skinless chicken breasts
4 cups (100 grams) day-old French bread cut into cubes
2 cups parmesan cheese
2 sprigs of marjoram 
1/2 teaspoon salt
A pinch of pepper
Extra virgin olive oil
1/3 cup red currants
2 cups raspberries

Instructions: 

1. Take one loaf of day-old bread and cut off the hard crust. Next, cut the bread into small cubes and fill four measuring cups. Put the pieces of bread into a bowl with enough milk to almost completely cover the bread and leave it to soak for at least 5 minutes. 

{French bread with the crust removed. Obviously this is not four full cups, but we forgot to take pictures of the process so this is the bread we had left!}


2. Slice a whole chicken breast into 1/2 inch slices...or go easy on yourself and use pre-sliced chicken breast :) Place the slices between two sheets of parchment paper and pound the chicken with a meat mallet until it's less than 1/4 inch thick. By placing the chicken between parchment paper (or plastic wrap), the meat will be less likely to tear apart when the mallet hits it. (Also, see here for an article that will convince you to always pound your chicken before cooking it.) 

3. Cut the chicken into rectangular pieces, as regularly shaped as possible. For example, if some slices are too wide or too long, cut off the excess meat until you have a nice rectangle generally 4 inches by 3 inches. If some pieces of chicken are not anywhere close to 3 inches wide, you can lay one skinny slice on top of another and in the oven they will bake together. 

4. Take the excess meat and dice it into small pieces. This meat will be used in the filling. 

5. Return to the bread, which should have softened sufficiently. Firstful by fistful, firmly squeeze the bread of excess milk. Discard any hard pieces. 

6. In a bowl pour 2 cups of parmesan cheese, the extra diced chicken (about 1 cup), the milk-soaked bread, salt, pepper, and the leaves of 2 sprigs of marjoram. With your hands, knead the ingredients together. 


7. Roll the stuffing into long cylinders and lay it on the strips of chicken breast. Stick the red currants into the stuffing. 


8. Roll the chicken lengthwise and tie with cooking twine. You can tie the chicken in any way you'd like, but if you're like me and need some extra guidance here are step by step directions. 

 {Nonna's hands. They've blessed many lives, especially ours!}

Lay the chicken on top of the cooking twine lengthwise. The twine on the left side of the chicken should be about 3-4 inches long while the cooking twine on the right side of the chicken should be at least one foot long. Summed up, the twine on the left should be shorter than the twine on the right. 


Pull up the two pieces of twine and make a cross on the far left hand side of the chicken. 


Take the cooking twine on the right and wrap it around the chicken 3-5 times. 


Next take the cooking twine on the left and wrap it around the back of the chicken as well. You should now have one end of the twine pointing upward and the other pointing downward. Pull the two ends together and tie into a knot. 


9. Place the tied chicken in a pan and dress with olive oil, salt, and pepper, and then put in the oven at 375 degrees for 20-25 minutes. Be careful not to overcook and dry out the chicken. 


10. While the chicken is cooking, prepare the raspberry sauce. Blend the raspberries (ideally with a small hand blender) and then press the berries through a strainer which will allow the raspberry juice to bleed through but keep the seeds seperate. 

11. When the chicken is golden, pull from the oven and serve immediately with the raspberry sauce on the side. Enjoy!


Friday, February 3, 2017

Spaghetti Frittata

When Andrea and I were dating, we met up one summer day after church and he suggested that we take a picnic to the lake. We went to his place and in twenty minutes he whipped up a gorgeous spaghetti frittata; we packed the frittata along with some drinks and fruit and drove off. It felt like the fanciest picnic I'd ever been on. This spaghetti frittata is extremely easy to make and will take your al fresco dining up a notch, especially when paired with fruit, cheese, and some bottles of San Pellegrino. Not only does a spaghetti frittata make a great picnic, it could also be an appetizer and a fun addition to a tapas spread. 


Spaghetti Frittata 
Frittata di spaghetti 


Ingredients:
12 ounces of spaghetti no. 5 (350 grams)
5 eggs
1 cup grated parmesan cheese
1 cup diced smoked scamorza (or any hard cheese, such as mozzarella)
1 cup diced prosciutto cotto, ham, or pancetta*
1/3 cup whole milk
Olive oil 
1/8 teaspoon pepper
1/2 teaspoon fine salt
Course salt for salting the pasta water

*If using pancetta, don't add extra salt to the dish as the pancetta itself is salty enough.


Instructions:

1. Just as meatballs originated from the need to use up leftover meat from dinner, the spaghetti frittata was created as a way to use up leftover spaghetti (dressed with a red sauce or undressed). Because of this unique origin, when making a spaghetti frittata the spaghetti must be room temperature before adding it to the pan. 

If you don't have any leftover spaghetti in the fridge, boil 12 ounces of spaghetti no. 5 in salted water. Something I hadn't previously noticed in the USA is that the varying thickness of spaghetti are given different numbers and used for different dishes. For example, what in America is called "angel hair spaghetti" is used in Italy only in broths and soups and would never be served with sauce on top. Spaghetti no. 5 instead is the classic thickness and the most versatile type of spaghetti. 

When it comes to pasta brands, one of the most common found in Italy as well as America is "Barilla." My personal favorite however, and known in Italy for it's excellent quality, is "Garofalo." When Andrea and I lived in America we would buy the "Garofalo" brand at Costco, but you can also buy it on Amazon.  

2. While the pasta is cooking, finely dice the prosciutto cotto and smoked scamorza. 

3. One minute before the suggested cooking time on the package, strain the water from the pasta. It will still be quite al dente, but will continue cooking in the pan. Dress lightly with olive oil to keep the noodles from sticking together and let sit until cool. 

4. Next, crack 5 eggs into a large bowl. Add salt and pepper, and scramble well. 

5. Add the scamorza, prosciutto, 3/4 cup of parmesan cheese and mix well. Then, slowly add the whole milk. Set aside. 


6. Take one clove of garlic and crush it under a wide knife. (By crushing the garlic, you're ensuring that it will better flavor the olive oil.) In a large pan, sauté the clove of garlic in 1 tablespoon of olive oil until the garlic is partially transparent and the aroma has hit its peak (about 2 minutes).

 {Crushing the garlic.}


7. After the garlic has infused the olive oil, pull it from the pan and pour in the room temperature spaghetti. Without stirring it, allow the spaghetti to fry in the pan over medium heat for 1-2 minutes. 


{This is leftover spaghetti dressed in a red sauce. A frittata made from spaghetti dressed only in olive oil is called la classica frittata di spaghetti, whereas when the pasta is dressed in a red sauce it's name is frittata di spaghetti avanzati, or in English lefover spaghetti frittata.}

8. Pour the mixture of eggs, prosciutto, and cheese evenly over the top of the spaghetti. Let the frittata cook for another 1-2 minutes, then sprinkle the remaining parmesan (about 1/4 cup) over the top. The parmesan cheese will help the frittata develop a crispy crust. 


 {Leftover spaghetti frittata with red sauce.}

9. Cover the pan with a lid and allow to continue cooking over medium heat for 15-20 minutes, quickly shaking the pan every few minutes to keep the frittata from sticking to the bottom. When the bottom of the frittata is golden brown it is time to flip it. 


FLIP THE FRITTATA

10. Hold the handle of the pan with your right hand and place your left hand on the knob of the lid.

11. In one swift move, flip the pan upside down holding the lid tight. The frittata will now be sitting on the lid. 

12. Place the pan back on the stove top and then let the frittata slide off the lid back into the pan. The side of the frittata that was cooking against the bottom of the pan should now be showing, allowing the other side to crisp up. 


13. After flipping the frittata, allow to cook for another 4-5 minutes without the lid. 

14. When the underside is sufficiently coked, transfer the frittata to a large serving platter. (It should easily slide from the pan to the platter without you needing to lift it.) Allow to cool down completely before cutting and serving. Enjoy!


 {The spaghetti frittata will keep in the fridge for 2-3 days, but obviously it won't last that long.}